Recreate the original.

Before I say anything else:
A HUGE THANKS TO MY AMAZING MOM!!!!!!! She stayed with me for over an hour to take pictures of my tutorial!
But this braided updo doesn't take THAT long when I'm doing it on myself.
Welcome to my first hair tutorial!! I LOVE fixing my hair, and coming up with new braids that I haven't seen before, like this one I'm about to show you. It looks very difficult, but once you get the braid down, it's very repetitive. So I hope you enjoy the tutorial, and please, just because it might sound difficult, doesn't mean you can't try it!
There are only a few items needed to create this hairdo. You'll need:
1. Bobby Pins - these will hold your updo in place.
If you don't have bobby pins, you can use hairpins or spinpins. OR if you wanted, you can use Lilla Rose Flexi Clips. I used bobby pins for this hairstyle because I didn't want to take away from the braid.
2. Hair Elastics - you'll only need three at one time, and one clear one.
But, if you don't have a clear one, you can use one that's similar to your hair color.
3. Hair Spray - this isn't absolutely necessary, but adds extra hold to your updo.
4. Teasing Brush - you don't HAVE to tease (backcomb) your hair, but it adds nice volume to the top.
If you don't have a teasing brush, you can use a very fine tooth comb, or just skip the teasing entirely.
5. And, of couse you'll need a mirror. :)
You're ready, so let's get started!!
1

Grab a small-ish section of hair about the width of the end of your eyebrows.
It shouldn't be very big, because you want to leave the rest of your hair for the braid.
2

Flip that section up and tease the back of it. This is also called "backcombing".
This adds volume to the front, so you don't look bald.
You can tease a lot or a little depending on what you like.
3

Now flip that section off your face so it's laying down on the top or your head.
You can see in the picture it's puffy, but it won't stay THAT puffy.
4

Bobby pin that section of hair securely on the top of your head.
It should still be full-looking on the front, but not very high.
5

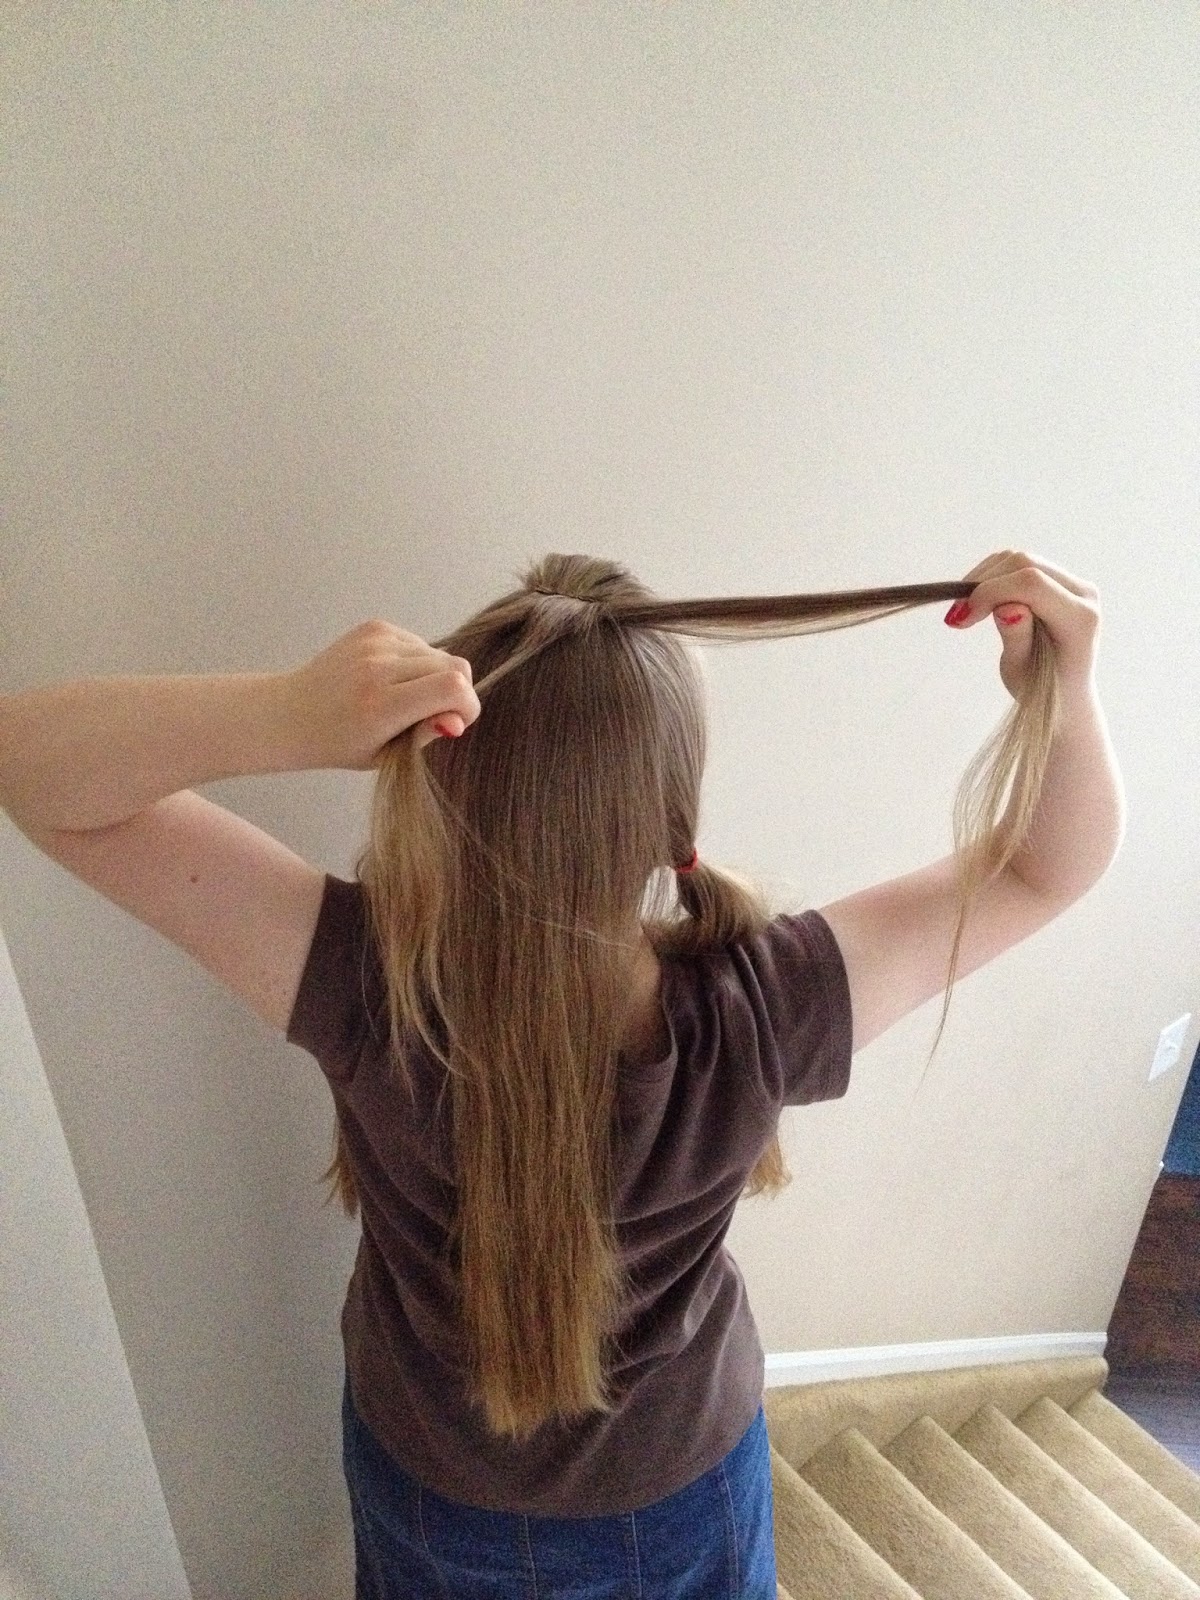
Divide your hair (from the right-most side of the bobby pins you just pinned) all the way down to your neck. You don't want the part to end up the center of your neck at the bottom, but just to the right of it.
6

That section doesn't have to be perfectly straight. You can see how it's not down the center of my head, and that's how you want yours to be.
7

Now ponytail that section of hair just so it's out of the way for now.
You won't be keeping this in for the whole style.
8

Repeat on the other side of your head, going down slightly to the left of the center of your head.
Ponytail that section as well.
9

Now take a small section of hair the width of the bobby pins.
It should be just behind the bobby pins. You'll be working with this section next.
10

Divide that section into three equal pieces.
11
Now take the right-most section of the small section...

And cross it under the middle section.
You've now created a new middle section.
12

Now take the left-most section...

And cross it under the new middle section.
13

Hold the three sections out of the way for now, and take a small section of loose hair on the right side of your head, and combine that new section you picked up with the right-most strand, like you would do a French braid.
This is now one section of hair.
Then cross that section of hair under the middle.
14

Hold the three sections of hair out of the way for now, and grab a small section of loose hair from the left-most side. Add that to your left-most strand. That is now one section of hair.
Cross the combined section of hair under the middle.
You're creating a "Dutch Braid"!
15

Repeat step 13 again, and then step 14 until you've incorporated all the hair of the middle section of into your braid. It should look something like this picture. (above)
16

Once you've added in all the hair of the middle section to your braid, don't keep braiding down.
You're going to start pancaking.
Take each of the edges of the braid (starting at the bottom and working your way up) and pull them slightly. You don't want to pull the braid completely out.
17


Continue pancaking the whole way up the braid. Repeat on your left side.
18

Now it should look like this. (above)
19

Continue the braid and pancake as you go the whole way down. Tie off the braid with an elastic.
You should have one full-looking braid going down the center back of your head.
20

Take the ponytail out of the right-most section only of hair and let the hair hang loose.
And this is where I took a break for supper.
21


Take a small section of hair just behind the front of your hair. (picture no. 1 of step 21)
You want the section of hair to start at about the same place the braid started.
22

Now divide that section into three equal sections.
23

Take the right-most strand of hair and cross it under the middle.
You've now created a new middle section.
24

Now take the left-most section of hair and cross it under the middle section.
25

Now take a small section of hair from the right-most side of loose hair, and add it to the right-most strand. This section should start to pick up the hair from the front.
26

Cross that combined section of hair under the middle section.
This next part might be confusing, but bear with me.
27

Hold all three sections of hair with your right hand, but keep them separate.
28

At the top of the beginning of the first braid you did, take the section....
(the one I'm pointing to)

And put your first and middle fingers under that loop.
Spread your fingers apart.
29

Now pinch the left-most section of hair with those two fingers...

And pull that section of hair through the section your fingers were in...

Like this. (above)
30

Take the section of hair you just pulled through the other section, and cross it under the middle section of this current braid you're starting.
Now take section of hair from the loose hair and add it to the right-most strand, and cross the combinded section of hair under the middle section.
31

Now hold all three sections again with your right hand.
32

Move to the section JUST BELOW THE SECTION YOU PULLED THE HAIR THROUGH...
(the one I'm pointing to)

Slip your fingers under that loop of hair, and spread your fingers apart.
33

Now pinch the left-most strand of hair with your fingers and pull it through the section...

Like this. (above)
34

Repeat setps 27 through 33 until you've added in all your hair.
35

Once you've added in all your hair, put your fingers through one more section of the original braid, pinch the left-most strand of hair, pull it through one last time, and cross it under the middle.
36

Now hold all three sections of hair with your left hand...

And pancake the outer edge ONLY of the braid you just created...

It should look like this. (above)
37

Continue the rest of the braid, pancaking as you go (on both sides), the whole way down the length of your hair. Tie off the braid with an elastic.
At this point you won't be adding in any other sections of new hair.
You'll do the same thing you just did with the right section of hair, only now you'll do it with the left section of hair.
I've already started the braid on the left side of my head, so I'll just do a few steps for you.
38

Hold all three of your sections of hair with your left hand.
Take the next section of hair...
(the one I'm pointing to)

Put your fingers through that section...

Grab the right-most section of hair and pull it through the section your fingers were in.
Now take a section of hair from the loose side of hair, and add it to the left-most strand, then cross the combined section under the middle.
39

Repeat step 38 until you don't have any hair left to add into the braid.
40

Once you've added all the hair, put your fingers through the next section, grab the right-most strand, and pull through one last time.
41

Now stop braiding and pancake the outer edge of the braid...

Continue the braid without adding in new sections of hair. Pancake as you go along braiding. Tie off the braid with an elastic.
Now your hairdo should look like this. (above)
42

Now braid all three of the braids together. Just do a regular, plain braid, and braid to the ends of your hair.
43

Now take a clear or hair-colored elastic...

And tie off the whole big braid together.
Pull out the other elastics you used earlier.
44

At this point you can stop if you want, and you'll have a very interesting braid!
But if you want an updo, continue on...
45

Take the big braid and tuck the tails under the braid...


Roll up the braid under itself until it's sitting where you want...

Like this. (above)
46

Now take a bobby pin, and pin the updo in place (use as many bobby pins as you need).
You want to take small sections of hair when you're pinning, because that holds better...

Like this. (above)
All right... are you ready?? Are you sure?
Okay, get ready....
YOU'RE DONE!!!!!!!
YES, you've really finished it!!!
The finished product...


Voila!
Pretty, isn't it?
I hope you've enjoyed this hair tutorial! I enjoyed making it, and would love to see pictures of you wearing this style! Just drop me a comment below with the picure in it!
And if anything was unclear, just leave me a comment about the problem, and I'll do my best to explain it better for you!
One more thing...
Should I do another tutorial of a different hairstyle? :-)
If you have a specific hairstyle you'd like to see a tutorial for (if you have a picture) you can leave a comment (with the picture in it) and I can do my best to make a tutorial!!
In Christ,
Amara
P.S.
Do NOT sell, copy, or otherwise mess around with the hairdo idea or tutorial without permission from the stylist. In other words, "Thou shalt not steal."
Always ask if you need to use this in any other way than for personal use. :)